How To Sew A Welt Pocket
Want to add a professional touch to your sewing projects? Learning how to sew a welt pocket is a skill that can instantly upgrade your garments and bags.
It might seem tricky at first, but with the right steps, you’ll create clean, sharp pockets that look store-bought. In this guide, you’ll discover simple tips and clear instructions to master welt pockets quickly. Ready to impress yourself and everyone who sees your work?
Let’s dive in and make your next sewing project stand out!

Credit: blog.wafflepatterns.com
Materials Needed
Gathering the right materials is the first step to sew a welt pocket. Use quality tools and fabrics to get neat results. The materials listed here are essential for this sewing task.
Fabric
Choose a sturdy fabric for the pocket and garment. Cotton, denim, or wool work well. Use fabric that matches your project for a clean look.
Thread
Select thread that matches your fabric color. Strong polyester or cotton thread is best. It should hold seams tightly without breaking.
Needles
Use a sharp sewing needle suitable for your fabric. A universal needle size 80/12 fits most materials. Hand sewing needles or machine needles work well.
Scissors
Sharp fabric scissors are important for clean cuts. Avoid dull scissors that can fray fabric edges. Keep scissors only for fabric use.
Measuring Tools
Use a ruler or measuring tape for precise cuts. A clear ruler helps mark straight lines easily. Accurate measurements ensure pocket symmetry.
Marking Tools
Use tailor’s chalk or fabric pens to mark fabric. These marks guide your sewing lines. Choose colors that show clearly on your fabric.
Sewing Machine
A sewing machine speeds up the process. Use a machine with straight stitch settings. It helps create strong, neat seams for welt pockets.
Iron And Ironing Board
Press fabric pieces before and after sewing. An iron sets seams and makes fabric crisp. Use an ironing board for a flat surface.
Choosing Fabric And Thread
Choosing the right fabric and thread is key to sewing a perfect welt pocket. The fabric affects the pocket’s look and strength. The thread must hold the stitches without breaking. These choices help the pocket last longer and look neat.
Choosing Fabric For Your Welt Pocket
Pick fabric that matches your garment. Use medium-weight fabric for better shape and support. Thin fabric can sag or tear easily. Thick fabric may be hard to sew and bulky. Cotton, linen, and wool blends work well for most projects.
Consider the fabric’s stretch. Avoid fabrics that stretch too much. Stable fabrics keep the pocket’s shape. Matching fabric color helps the pocket blend in. Contrast fabric can make the pocket stand out as a design feature.
Selecting The Right Thread
Use thread close to your fabric color. This keeps stitches invisible and neat. Choose polyester thread for strength and flexibility. Cotton thread suits natural fabrics but can break easily. Match thread weight to fabric thickness for smooth sewing.
Test the thread tension on a scrap piece. Proper tension avoids puckering or loose stitches. Strong thread prevents the pocket from coming undone. Avoid cheap thread that frays or snaps during sewing.
Marking The Pocket Placement
Marking the pocket placement is the first step in sewing a welt pocket. It helps to position the pocket accurately on the fabric. Correct placement ensures the pocket looks neat and works well.
Marking also guides cutting and stitching. Without clear marks, the pocket may end up crooked or uneven. Taking time to mark carefully saves effort later.
Choose The Pocket Location
Decide where the pocket will sit on the garment. Common spots include the chest, waist, or hips. Consider the garment style and user comfort.
Use a ruler or measuring tape to find the exact spot. Mark lightly with tailor’s chalk or a fabric pen.
Measure And Mark Pocket Dimensions
Measure the length and width of the welt pocket opening. Transfer these measurements to the fabric. Draw a rectangle where the pocket will go.
Check the marks twice before cutting. This step prevents mistakes and fabric waste.
Use A Template For Precision
Create a paper or cardboard template of the pocket shape. Place the template on the fabric. Trace around it with a pencil or chalk.
A template helps keep the pocket size consistent on both sides. It also speeds up marking for multiple pockets.

Credit: thefloramodiste.com
Cutting The Pocket Pieces
Cutting the pocket pieces is a crucial step in sewing a welt pocket. Accurate cutting ensures the pocket fits well and looks neat. Take your time and work carefully for the best results.
Use a sharp pair of fabric scissors. Dull scissors can cause jagged edges and ruin the fabric. Lay the fabric flat on a clean surface before cutting. This prevents wrinkles and uneven cuts.
Preparing The Fabric
Wash and iron the fabric first. This stops the fabric from shrinking after sewing. Smooth fabric is easier to cut and handle.
Measuring The Pocket Pieces
Measure the pocket size on your pattern. Mark the fabric with tailor’s chalk or a fabric pen. Add seam allowance to your measurements. This gives space for stitching the pocket pieces together.
Cutting The Welt Pieces
Cut two welt pieces from your fabric. They should be long and narrow. Cut along the marked lines precisely. Keep the edges clean to make sewing easier.
Cutting The Pocket Bag
Cut two pocket bag pieces from a lighter fabric. These pieces hold the pocket space. Match the size with your pocket opening. Use soft fabric to avoid bulk inside the pocket.
Creating The Welt Flaps
Creating the welt flaps is a key step in sewing a welt pocket. These flaps give the pocket a clean, professional look. They also help keep the pocket opening neat and strong.
Welt flaps are small strips of fabric sewn above and below the pocket opening. Making them correctly ensures the pocket looks even and fits well.
Cutting The Fabric For Welt Flaps
Start by cutting two strips of fabric. Each strip should be twice the width of the finished welt plus seam allowance. The length depends on the pocket opening size. Cut carefully for straight, clean edges.
Pressing The Welt Flaps
Press each strip in half lengthwise with the right sides together. This creates a sharp crease. Open the strip and fold the raw edges to the center crease. Press again. This step shapes the flaps neatly.
Stitching The Welt Flaps
Place the folded strips on the pocket opening. Align edges carefully. Sew along the edges with a straight stitch. Use a short stitch length for strength. Trim the seam allowance close to the stitches.
Turning And Finishing The Welt Flaps
Turn the flaps to the right side through the pocket opening. Press the flaps flat. Topstitch near the edge for a clean finish. This keeps the flaps in place and adds durability.
Sewing The Welt Pocket Opening
Start by marking the pocket opening clearly on your fabric. Carefully sew along the lines, keeping stitches straight and even. Press the fabric to create a crisp, clean welt pocket edge.
Sewing the welt pocket opening is a key step in making a neat pocket. It creates the space where the pocket sits. This part needs care and precision to look clean and professional.
The first step is marking the pocket opening on your fabric. Use tailor’s chalk or a fabric pen. Make sure the lines are clear and straight. These lines guide your sewing and cutting.
Stitching The Pocket Lines
Start by sewing along the marked lines. Use a straight stitch and keep stitches even. Sew two parallel lines, about 1/4 inch apart. This forms the pocket opening edges.
Backstitch at the start and end to secure the stitches. Do not sew beyond the marked lines. The space between these lines will be cut open later.
Cutting The Pocket Opening
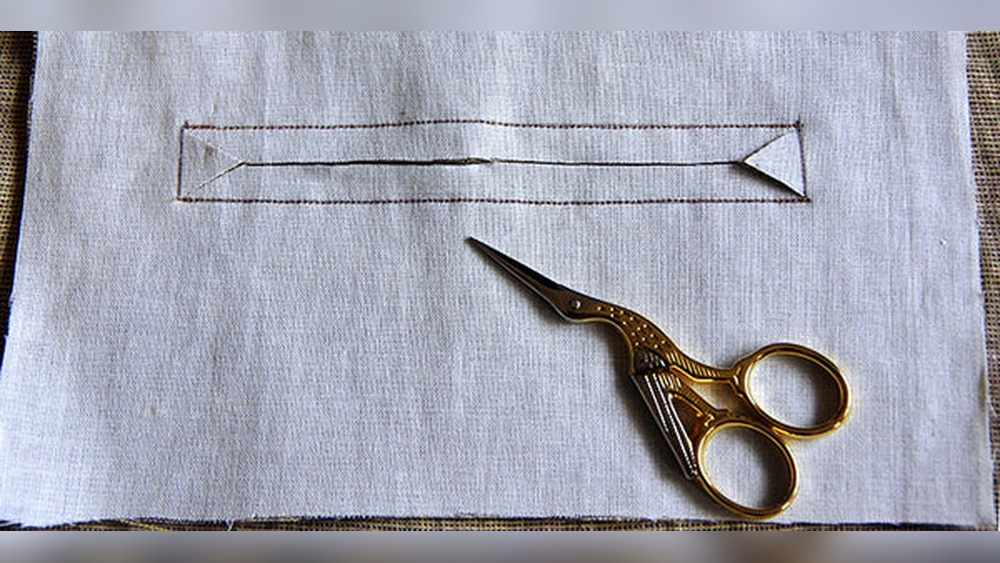
Cut carefully between the stitched lines. Cut only through the top layer of fabric. Leave a small triangle of fabric at each end uncut. This prevents the stitches from pulling apart.
Be precise and slow to avoid cutting the stitches. Use sharp scissors for clean cuts. This step opens the pocket and prepares it for the welt.
Turning And Pressing The Opening
Push the fabric edges through the opening. Turn the pocket right side out through the slit. Use a point turner or a blunt tool to shape corners.
Press the edges flat with an iron. This sets the shape and smooths the fabric. Pressing helps the pocket look sharp and professional.
Attaching The Pocket Bag
Attaching the pocket bag is a key step in sewing a welt pocket. It holds the pocket’s shape and creates space for your hand. This part needs care and precision.
Start by choosing the right fabric for the pocket bag. It should be light but strong enough to hold small items.
Preparing The Pocket Bag Pieces
Cut two pocket bag pieces from your chosen fabric. Make sure they match the pocket opening size. Finish the edges to prevent fraying later.
Aligning The Pocket Bag To The Welt
Place one pocket bag piece right sides together with the welt. Align the edges carefully. Pin the fabric in place to avoid shifting.
Stitching The Pocket Bag
Sew the pocket bag to the welt using a straight stitch. Keep the seam allowance even and neat. Press the seam open for a flat finish.
Attaching The Second Pocket Bag Piece
Now, attach the second pocket bag piece to the other side of the pocket opening. Pin it well. Sew with the same seam allowance as before.
Securing The Pocket Bag
After sewing both sides, sew the pocket bags together along the bottom and side edges. This creates the actual pocket space. Leave the top open for your hand.
Pressing And Finishing
Pressing and finishing are vital steps in sewing a welt pocket. They help the pocket look clean and professional. Good pressing shapes the fabric and sets the seams firmly. Finishing protects the pocket edges and improves durability. Follow these simple steps to perfect your welt pocket.
Pressing The Welt Edges
Start by pressing the welt edges flat. Use a hot iron and press cloth. Press gently to avoid fabric shine. Press the seam allowances toward the pocket opening. This keeps the pocket neat and crisp.
Shaping The Pocket Bag
Press the pocket bag away from the welt. This creates space inside the pocket. Use steam to soften the fabric before shaping. Smooth the fabric with your fingers while pressing.
Securing The Pocket Opening
Topstitch close to the welt edge. This holds the pocket opening firmly in place. Choose a thread color matching your fabric. Sew slowly to keep stitches even and neat.
Finishing The Pocket Bag Edges
Finish raw edges inside the pocket bag. Use a zigzag stitch or serger. This prevents fraying and extends pocket life. Trim excess fabric close to the stitching.
Final Press For A Clean Look
Give the pocket a final press. Use light steam and a press cloth. Press from the right side to avoid marks. This step gives a polished, professional finish.
Common Mistakes To Avoid
Sewing a welt pocket can be tricky for many beginners. Small errors can cause big problems. Avoiding common mistakes saves time and frustration. This section lists usual errors and how to steer clear of them.
Not Cutting Fabric Accurately
Cutting fabric too large or too small affects pocket shape. Use sharp scissors and measure twice before cutting. Precise cuts help achieve a neat and clean welt pocket.
Skipping Marking Steps
Marking pocket lines guides sewing and folding. Skipping this step causes uneven pockets. Use tailor’s chalk or fabric markers for clear lines.
Ignoring Seam Allowances
Seam allowances give space for sewing and turning fabric. Forgetting them makes pockets tight or misshapen. Always add correct seam allowance to your pattern.
Pulling Fabric While Sewing
Pulling fabric stretches and distorts the pocket. Let the machine feed fabric evenly without force. Smooth feeding creates straight and even stitches.
Not Pressing Seams Properly
Pressing seams helps pockets lay flat and look sharp. Skip or rush this step, and pockets appear bulky or wrinkled. Use an iron to press seams carefully after sewing.
Tips For Professional Results
Sewing a welt pocket can be tricky. Small mistakes can make it look messy. Follow these tips for neat and professional results. Each step helps you create a clean, sharp pocket that lasts long.
Take your time and work carefully. A patient approach improves your sewing quality greatly. Use the right tools and materials for the best outcome.
Choose The Right Fabric And Stabilizer
Select fabric that matches your garment’s weight. Use a stabilizer to support thin or stretchy fabric. It stops the fabric from puckering or stretching out of shape.
Mark Precisely And Use Sharp Tools
Mark pocket lines clearly with tailor’s chalk or a fabric pen. Use a ruler to keep lines straight. Cut fabric with sharp scissors or a rotary cutter for clean edges.
Press Each Step Firmly
Press the fabric after each fold or stitch. Use a hot iron and a pressing cloth to avoid shine marks. Pressing helps shape the pocket and keeps seams flat.
Sew Slowly And Use The Right Stitch Length
Sew the pocket slowly to keep stitches even. Use a shorter stitch length for stronger seams. This prevents the fabric from pulling apart over time.
Check Seam Allowances And Align Edges
Keep seam allowances consistent throughout. Align fabric edges carefully before stitching. This avoids gaps and keeps the pocket symmetrical.
Reinforce Stress Points
Add extra stitches at pocket corners. These areas get more wear and tear. Reinforcement prevents the pocket from tearing or pulling loose.

Credit: workroomsocial.com
Frequently Asked Questions
What Materials Do I Need To Sew A Welt Pocket?
You need fabric, matching thread, sewing machine, scissors, pins, and a welt pocket pattern. Quality materials ensure neat, durable results.
How Long Does It Take To Sew A Welt Pocket?
It typically takes 30 to 60 minutes depending on your skill level and fabric complexity. Practice speeds up the process.
Can Beginners Sew A Welt Pocket Easily?
Yes, beginners can sew welt pockets with patience and clear instructions. Start with simple fabrics and practice basic stitches.
What Are Common Mistakes When Sewing Welt Pockets?
Common mistakes include uneven stitching, incorrect measurements, and fabric puckering. Careful marking and slow sewing help avoid these errors.
Conclusion
Sewing a welt pocket takes practice but gets easier with time. Follow each step slowly and carefully for best results. Use the right tools and fabric to make your work neat. Try on scraps before sewing on your final piece.
Soon, your clothes will look more professional and stylish. Keep practicing, and your skills will improve quickly. Enjoy adding this useful detail to your sewing projects.