How to Fix Sewing Machine Tension: Quick Tips for Perfect Stitches
Is your sewing machine stitching unevenly or leaving loops on your fabric? If so, your machine’s tension might be off.
Fixing sewing machine tension can feel tricky, but once you understand the simple steps, you’ll save time, avoid frustration, and create perfect stitches every time. You’ll learn exactly how to adjust your tension quickly and confidently — so your projects look professional and your sewing flows smoothly.
Keep reading, and you’ll never struggle with tension again!

Credit: www.youtube.com
Identifying Tension Issues
Identifying tension issues in a sewing machine is essential for smooth stitching. Tension controls how tight or loose the thread is during sewing. Problems with tension cause stitches to look uneven or messy. Finding these problems early saves time and fabric. Understanding what to watch for helps fix the issue faster.
Signs Of Incorrect Tension
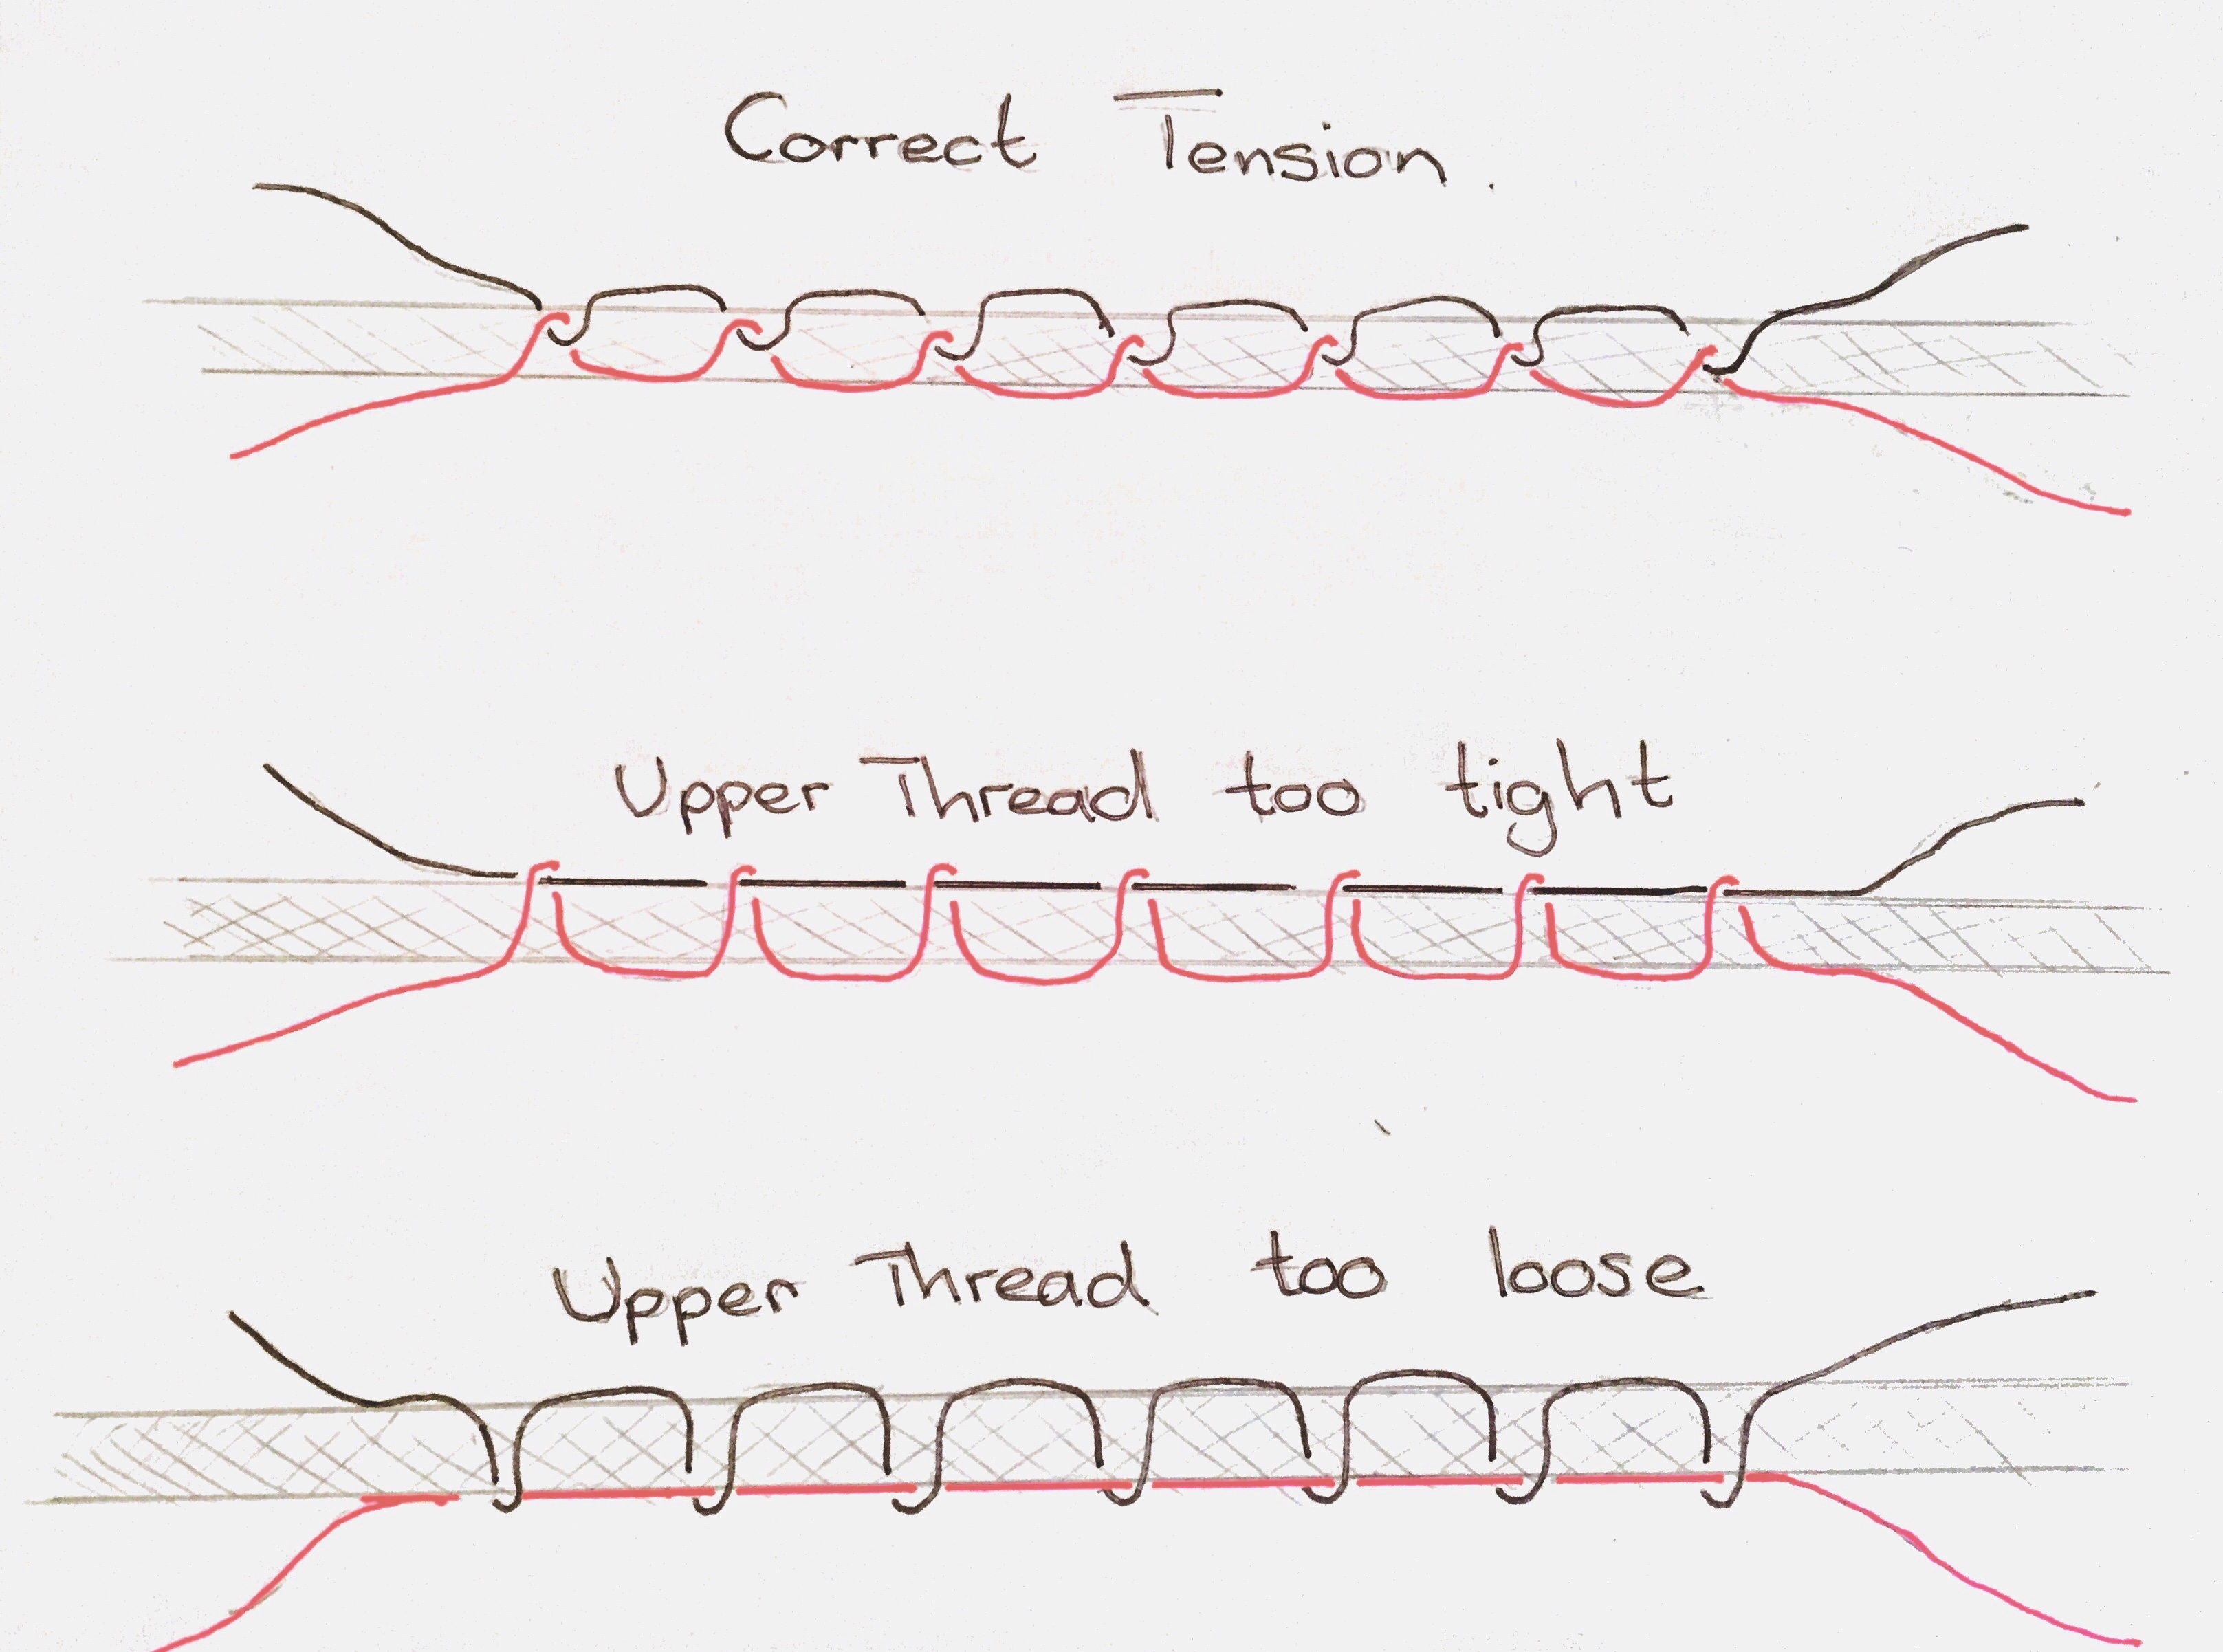
Uneven stitches are a clear sign of tension problems. Threads may loop or bunch up on the fabric’s underside. Tight tension can cause thread breakage or puckered fabric. Loose tension creates loose loops and weak seams. Stitch lines may look crooked or uneven. Listen for unusual sounds like clicking or snapping threads. Check your stitches often to spot these signs early.
Common Causes Of Tension Problems
Threading errors often cause tension issues. The thread may not pass correctly through tension discs or guides. Dirty or dusty tension discs can block smooth thread flow. Using the wrong thread type or size affects tension. Incorrect bobbin placement or winding also leads to problems. Worn or damaged parts inside the machine can cause tension to fail. Regular cleaning and proper threading prevent most problems.
Adjusting Upper Thread Tension
Adjusting the upper thread tension is key to smooth sewing. Proper tension keeps stitches even and prevents thread breaks. Learning to adjust this tension helps fix many common sewing machine problems.
Locating The Tension Dial
The tension dial controls the upper thread tightness. Usually, it sits on the front or top of the machine. It looks like a small numbered wheel or knob. Numbers range from low to high tension. Check your manual for exact location if unsure.
Step-by-step Tension Adjustment
Start by threading the machine correctly. Pull the upper thread gently to see its current tension. If the thread feels too loose, increase the dial number. Turn the dial one step at a time.
Sew a test line on scrap fabric. Look at the stitches on both sides. Tighten the tension if the upper thread loops on the bottom. Loosen it if the bottom thread shows on top.
Repeat adjusting and testing until stitches look balanced and smooth. Avoid large dial changes at once. Small moves give better control over tension settings.
Checking Bobbin Tension
Checking bobbin tension is key to smooth sewing. It affects stitch quality and fabric handling. Too tight or loose tension causes thread bunching or looping. This section guides you on how to check and fix bobbin tension properly.
Removing And Inspecting The Bobbin
First, turn off the sewing machine. Open the bobbin case cover carefully. Take out the bobbin from its case. Check the thread on the bobbin for any knots. Make sure the bobbin is wound evenly. Look for damage on the bobbin itself. A cracked or bent bobbin can cause tension issues.
Adjusting Bobbin Case Tension
Locate the small screw on the bobbin case. This screw controls the bobbin thread tension. Use a small screwdriver to turn the screw slightly. Turn clockwise to tighten tension or counterclockwise to loosen it. Make tiny adjustments and test stitch after each change. The bobbin thread should pull smoothly with slight resistance. Avoid over-tightening, which can break the thread.
Credit: www.sewschool.co.uk
Threading Tips For Better Tension
Thread tension is key for neat sewing. Poor tension causes loops or puckers. Correct threading helps fix tension problems quickly. Follow simple tips for better thread flow and smooth stitches.
Proper Threading Path
Make sure the thread follows the correct path through the machine. Check the thread guides carefully. Pass the thread through each guide firmly but gently. Missed guides cause loose or tight stitches. Pull the thread tight after threading to avoid slack. Re-thread the machine if stitches look uneven.
Choosing The Right Thread
Select thread that matches your fabric weight and type. Thin fabric needs lightweight thread. Thick fabric needs stronger, heavier thread. Poor thread choice can create tension issues. Use high-quality thread to reduce breakage and tangles. Avoid old or dusty thread for smooth sewing.
Testing And Fine-tuning
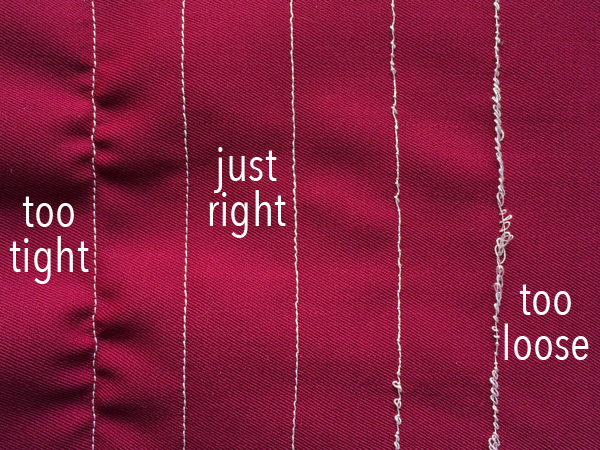
Testing and fine-tuning sewing machine tension is crucial for smooth stitching. Small changes can make a big difference in stitch quality. Taking time to test helps avoid thread breaks and uneven seams. Careful adjustments ensure your sewing projects look neat and professional.
Using Scrap Fabric For Tests
Always test tension settings on scrap fabric first. Choose fabric similar to your project material. This shows how stitches will behave on your actual fabric. Sew a few lines and check stitch balance. Look for tight or loose loops on top and bottom. Scrap fabric prevents damage to your real work.
Making Incremental Adjustments
Adjust tension in small steps. Change the dial one number at a time. Sew another test line after each change. Observe the stitch quality closely each time. Stop adjusting when stitches look even and smooth. Small tweaks help find the perfect tension quickly.
Credit: www.craftsy.com
Maintenance To Prevent Tension Issues
Proper maintenance keeps your sewing machine’s tension steady. Tension problems often start with dirt or worn parts. Regular care helps the machine run smoothly and prevents thread issues.
Cleaning The Machine
Dust and lint can build up inside your sewing machine. This buildup affects tension and stitching quality. Open the machine’s covers and use a small brush or compressed air to clean it. Remove thread scraps from the tension discs and bobbin area. Clean parts regularly to avoid tension problems and machine jams.
Regular Servicing
Machines need expert checkups to stay in good shape. A professional can adjust tension and fix worn parts. Regular servicing keeps the machine balanced and extends its life. Schedule service yearly or as recommended by the manufacturer. Well-serviced machines have fewer tension problems and sew better.
Frequently Asked Questions
How Do I Know If My Sewing Machine Tension Is Wrong?
Uneven stitches, thread loops on fabric edges, or thread breakage indicate tension issues. Check your stitches carefully to spot problems early and adjust tension accordingly.
What Is The Best Way To Fix Sewing Machine Tension?
Start by cleaning the tension discs and rethreading the machine. Adjust the tension dial in small increments until stitches are balanced and smooth on both fabric sides.
Can Wrong Tension Damage My Sewing Machine?
Yes, incorrect tension can cause thread breakage and needle damage. It may also strain machine parts, reducing its lifespan and sewing quality.
How Often Should I Adjust My Sewing Machine Tension?
Adjust tension whenever you switch fabric types or thread thickness. Regular checks ensure optimal stitch quality and prevent tension-related sewing problems.
Conclusion
Fixing sewing machine tension is easier than you think. Check the thread path and adjust the tension dial carefully. Test on scrap fabric to see the results. Small changes make a big difference in stitch quality. Keep your machine clean and well-oiled for smooth work.
Practice these steps often to avoid tension problems. Sewing becomes more fun with the right tension setting. Stay patient and take your time. Your projects will look neat and professional soon.